Introducing the best futuristic programming language to learn in 2025
If you want to start programming language recently, we will introduce you three of the best.

For those who are interested in Android programming through Python, they can start learning by installing
For those interested in Android programming through Python, they can start learning by learning how to install Kivy Python on Windows.
The first step to using Kiwi is to install Python, which if you are just starting to learn and do not have Python installed on your system, you should Learn how to install Python on Windows 7 before continuing.
After installing Python, join us in continuing the Itrooz Academy article to start programming Android using Python.
You can install Kiwi in different ways. Both separately by executing the necessary commands via CMD and through user interfaces through which you can program.
In the next articles, we plan to teach Kivy projects on its most powerful user interface, Pycharm IDE, so in this article we will explain two methods of installing Kivy.
To install kivy, enter the following commands via CMD.
1. Update or install pip
python -m pip install --upgrade pip wheel setuptools
2. Install dependencies
python -m pip install docutils pygments pypiwin32 kivy.deps.sdl2 kivy.deps.glew

python -m pip install kivy.deps.gstreamer
3. After that
python -m pip install kivy.deps.angle
4. Install Kiwi
python -m pip install kivy
5. You can also install Kiwi as follows (this is optional)
python -m pip install kivy_examples
Finally, the Kiwi installation is complete, but Kiwi may give an error at the last stage. If so, download this file from the following address.
Address: https://www.lfd.uci.edu/~gohlke/pythonlibs
فایل : Kivy-1.11.1-cp38-cp38-win_amd64.whl
After downloading, place the file in drive C and run the following code.
python -m pip install c:\Kivy-1.11.1-cp38-cp38-win_amd64.whl
The software must be installed on the system before installation.
If you have already installed the software, continue with the tutorial.
Otherwise, please read the article Pycharm IDE Tutorial and then continue with the tutorial.
To install kivy via Pycharm IDE, follow the path below.
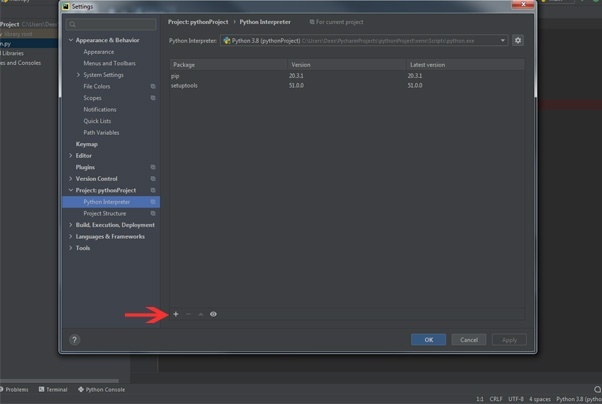
File > Settings > Project: pythonProject > Python Interpreter
Note that pythonProject is the name of the first project that is created after installing Pycharm IDE if you do not create a new name for it yourself.
If you choose a different name for your project, that name will be placed here.
Two packages are installed by default on the Python Interpreter page
If you look at the Kivy installation instructions separately, these two packages are listed before installing Kivy. Therefore, to install these two packages, they must be in this section.

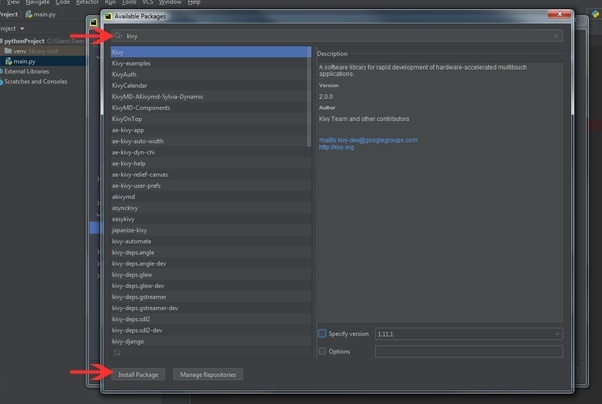
To install the new package, click on the positive button as shown in the image and from the menu that opens, type the word kivy in the search field and click on the Install Package button.

Wait a few moments for the package to download and install.
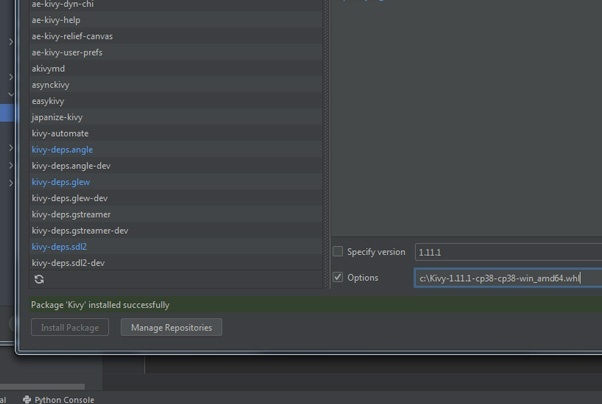
Finally, a green message will be displayed next to the Install Package button indicating that the installation was successful.
Sometimes you will get an error at this stage and the package will not be installed. You need to go to the following address and download the file.
Address: https://www.lfd.uci.edu/~gohlke/pythonlibs
فایل : Kivy-1.11.1-cp38-cp38-win_amd64.whl
After downloading, place the file in drive C and enter the following address in the Options section.
c:\Kivy-1.11.1-cp38-cp38-win_amd64.whl

Finally, you will see the message "installed successfully". Exit this page.
Now on the Python Interpreter page, you should see that other packages, including kivy, have been added to the program.
Congratulations, you have successfully installed Kiwi.
Source » Itroz Academy

What is AEO and why is the future of SEO dependent on it? In this article, get a complete and practical understanding of Answer Engine Optimization.

How AI Makes Decisions: A comprehensive and engaging look at machine learning models and how they work in the real world for the general public.

When it comes to creativity, are we talking about Sora or ChatGPT? So for a better understanding, let's compare.

A complete review to understand what the metaverse is? An important topic these days that we are examining from all angles.
Comments (0)